Importing .csv Data into Microsoft OneNote
Oct 3rd, 2021
A couple days ago when I was reviewing my notes to refresh my memory on some topics, I noticed that my notes were not stored in a single "notebook" - they were spreaded across multiple notetaking apps. This was because I could not settle on one notetaking application; I was struggling to find one that gives a good balance on all of my needs. As a result it quickly became quite difficult to find the specific notes I wanted to review.
Since I have been using Microsoft OneNote for notetaking purposes for awhile now, I decided to place all of my notes from other notetaking apps into Microsoft OneNote. But that sounds like a cumbersome and tedious job to do manually, doesn't it? So, after doing some googling on the best way to create Microsoft OneNote pages programmatically, I decided to create a custom, unpublished Microsoft OneNote add-in to do all of that work for me.
A slight note before we begin: You can only use your custom Microsoft OneNote add-in in the web version of Microsoft OneNote.
Creating a Microsoft OneNote add-in project
The process to create a Microsoft OneNote add-in project is well explained and documented in the official guide. Follow the steps described in the guide to create a simple quickstart Microsoft OneNote add-in project. This project will serve as our template to build our custom add-in.
Although it is not necessary for this guide, I highly recommend reading through the development lifecycle of Office add-ins to get a better understanding of how a Microsoft OneNote add-in works.
Modifying the quickstart project
Once you have set up the quickstart add-in project, we can now proceed to modify it for our purpose.
First, we will need to add an input element in the taskpane HTML document.

- Navigate to
taskpane.html - Under the
<div>tag withid="run", add a newinputelement:<input type="file" id="file-selector">
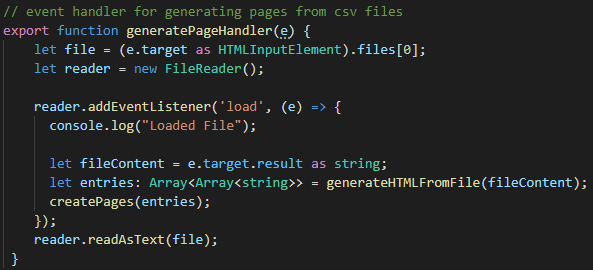
Now, we will need to add an event listener to that input element so it will parse the csv file and create a page for each record once you uploaded a csv file.

- Navigate to
taskpane.ts - Under the line where the
runbutton was selected, select theinputelement from the document usinggetElementById(..)onfile-selector: - Add an event listener to that
inputelement withaddEventListener(..)for thechangeevent: - Pass into the
addEventListener(..)a callback function calledgeneratePageHandler. This will be called once a csv file is uploaded
The generatePageHandler function is where we will handle the process of parsing the file and generating the pages.

- Create the
generatePageHandlerfunction. Within it: - Create a
FileReaderinstance to read the file - Add an event listener to the
FileReaderfor theloadevent - Once the file is loaded, it should be parsed and pages should be generated from the content stored within
e.target.result. We will define thegenerateHTMLFromFilefunction later for parsing the csv file and creating HTML strings. We will also define thecreatePagesfunction later for generating the pages for each record in the csv file - Now that the callback function is defined, read the csv file as text using
readAsText()function on theFileReaderinstance
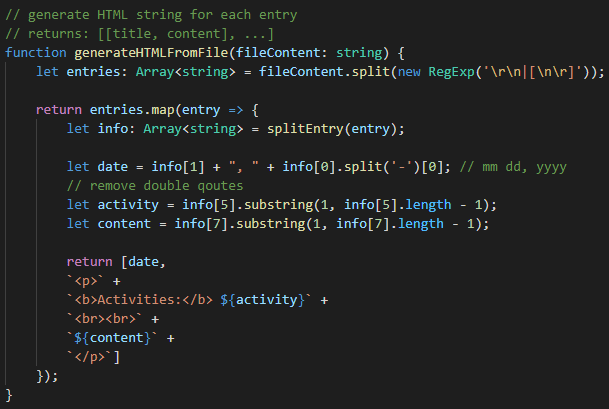
The generateHTMLFromFile function will return HTML strings from the csv file.

- Create the
generateHTMLFromFilefunction. Within it: - Split the file into arrays of records
- For each record, extract whatever you need and create HTML strings with them. For example, surround a
<p>tag around your content.
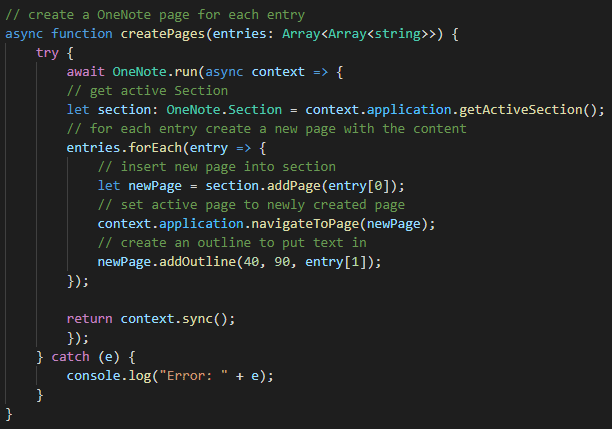
The createPages function will create Microsoft OneNote pages with those HTML strings using Microsoft OneNote API.

- Create the
createPagesfunction. Within it: - Invoke Microsoft OneNote's
runfunction from the Office API. It should contain all interactions with Microsoft OneNote - Within the lambda function, retrieve the current active Microsoft OneNote
sectionby calling thegetActiveSection(..)method oncontext.application - Perform steps 4 through 7 for each record:
- Add a new
pageby callingaddPage(..)on thesectionproxy object - Change the current active
pageto this newpageby callingnavigateToPage(..) - Invoke the
addOutline(..)method on thepageobject to add your content into it - Return on
context.sync()to sync Microsoft Office objects' states
You can refer to the source code here.
Using your custom Microsoft OneNote add-in
- Start your development server by running
npm run start:web - On the web version of Microsoft OneNote, select your notebook and create a new section
- In the toolbar under
Insert, selectOffice Add-ins - Once the window is opened, select
Upload My Add-inlocated next to theRefreshbutton. A new window should pop up asking you to upload your project'smanifest.xml - Proceed to upload your project's
manifest.xml. Once that is done, you should be able to see your add-in located underHomein the toolbar - Open your add-in panel. There, you should be able to see a button to upload your csv file. You should now be able to click on it to import your csv file into Microsoft OneNote and see that a page is generated automatically for each record.
References
o365devx. “Build Your First OneNote Task Pane Add-In.” Office Add-Ins | Microsoft Docs, 4 Aug. 2021, https://docs.microsoft.com/en-us/office/dev/add-ins/quickstarts/onenote-quickstart.
“Onenote Package - Office Add-Ins.” Office Add-Ins | Microsoft Docs, https://docs.microsoft.com/en-us/javascript/api/onenote?view=onenote-js-1.1.